Wednesday, August 22, 2012

the eggplant experiment


With a perfectly picked eggplant and a few hours to kill before work I decided to throw together something I've been wanting to make for a while now--eggplant burgers! Since these little gems contain no cheese, minimal amounts of oil, and plenty of everything else I love they turned out to be a delicious and nutritious meal that will be sure to last me a few days.

Besides the fact that they look absolutely fabulous they are also super easy to make, which is always a plus.  Prep and cook times total up at a little over an hour, but 45 minutes of that is spent patiently waiting for them to bake to perfection--I took this time to shower and do some laundry so the timing worked out quite nicely.

You're going to start by preheating your oven to 450° and lining a cookie sheet with aluminum foil. Slice the eggplant into quarter-inch rounds and brush each side with olive oil before sending them off to roast for 15 minutes- but be sure to flip them after 10.


While they're in the oven, dice one red onion and sauté over medium heat until soft.  
Add the onions into a large bowl with 1/4c chopped fresh parsley, 1/4c bell pepper (I used yellow since I love the sweetness), 1 T pine nuts,  1 clove of garlic (crushed), a 14 oz can of cannellini beans, 1 tsp ground cumin, sea salt, and your perfectly roasted eggplant rounds.


Give the mixture a stir to break up the eggplant before adding in 1/2c of hummus (I used garden veggie...the more, the merrier, right?) and transferring your burger base to a food processor. It should only take about 15 seconds for your veggies to smooth out--when this happens, transfer back to the bowl and work in 1c panko breadcrumbs to give it some body.  


With a fresh nonstick-spray-coated piece of foil on your cookie sheet, form 6 patties and throw them in a 400° oven for 45 minutes, flipping halfway through.  If you like them crispier don't be afraid to up the time a bit--they're still very moist and it seems as though it would take a lot to dry these bad boys out. 

While they were cooking I whipped together some tahini to top them off with.

1/3c sesame tahini, 1/3 c water, 1/4c lemon juice, salt, and 2 cloves of chopped garlic
go into a food processor until fully combined

Drizzle a bit over the top & enjoy!

Sunday, June 17, 2012

...& everything nice


Snickerdoodles are simple, familiar and an all around crowd-pleaser of a cookie.  The cinnamon sugar coating is something everyone can appreciate and the soft, chewy nature of it is enough to please even the toughest critic.

Start by creaming the butter and sugar together.  Beat in eggs and vanilla followed by a gradual addition of the combined dry ingredients.  Voila! Snickerdoodle dough!

I chose to chill mine in the fridge for about 15 minutes so it would firm up a bit. Afterwards I formed the dough into balls and rolled them into a cinnamon sugar mixture before using the heel of my hand to flatten them a bit. Bake between 375°- 400° (depending on your oven...be very careful not to overcook!) for 7-8 minutes.

The cookies will be just barely set, but don't worry, they'll harden slightly as they cool.

Eat up!

cocoa loco


Let me preface this post by saying this is a cookie for everyone.  Not only because it's ridiculously good, laden with chocolate, and easy to make...but because it has Oreo's and Mounds in it...how could anyone in their right mind turn down a combination like that? Searching for a good recipe for anything usually leads me to google search "best (insert item here) recipe" and seeing what results peak my interest.  These gems were hiding amongst the crowd and boy am I glad I took the time to poke around.

Beat 3/4 c unsalted butter and 1/3 c butter-flavored shortening until creamy.  Gradually add 1 c granulated sugar  and 3/4 c dark brown sugar and mix until it's light and fluffy.  Beat in 2 eggs and 2 tsp vanilla.  After all those ingredients are well blended slowly add 2 c flour, 2/3 c unsweetened cocoa, 1 tsp baking soda and a pinch of salt until combined.
Stir in your coarsely chopped Oreo's and Mounds.  The Mounds cut much easier if they're chilled for a bit first, which I recommend doing.  Wrap the dough in wax paper and refrigerate for at least a half hour. After they've firmed up make approximately 1/4 c sized balls and place them about 2" apart. 

Bake at 350° on parchment paper for 10-12 minutes-the cookies will barely be set at this point.  Let them cool before transferring to a wire rack

The recipe calls for an additional cup of chocolate chips- I chose to leave these out since I wasn't looking to get punched in the face with chocolate...moreso a sweet caress.  Mission accomplished.  I think chopped walnuts (or any other nut) would be a nice addition to this sweet treat.  This recipe yields about 30 cookies.

powerless over flourless


These flourless peanut butter chocolate chip cookies were probably one of the easiest baked goods I've ever made.  With 6 simple ingredients you have a rich, peanut-buttery cookie loaded with melty chocolate chips.  What's not to love?  I've made them twice already...they don't last long, believe me.

Combine peanut butter, sugar, egg, baking soda and salt.  Stir in chocolate chips.  Bake at 350° for 12-15 minutes on parchment paper.

& that's it.

Seriously.

You should get about 2 dozen out of one batch- they're relatively small cookies but once you taste how rich there are you'll understand why they don't need to be any bigger.  Make sure you let them cool for at least 15 minutes on the cookie sheet before transferring to a wire rack- some of mine crumbled (which of course I ate) when I tried to be ambitious and move them earlier. 

Enjoy!

Wednesday, April 25, 2012

sugar & spice


Friday started a four day weekend for myself and what better way to kick it off then to do a little baking.  I was looking for something tasty that would withstand my train ride to Boston that afternoon so the obvious choice for me was cookies.  But what kind of cookies? Deciding on just one type is always the hardest part.  After perusing some of my cookbooks I came across a recipe for Ginger Molasses Cookies via Flour in Boston that my sister had given me for a gift.  If you haven't heard of this bakery, or the cookbook either for that matter, I highly recommend it.  Delicious recipes and informative instructions make for a fool proof dish.

This recipe calls for dark molasses and light brown sugar...I had regular molasses and dark brown sugar.  I considered this to be an even trade and the cookies still came out fabulous!
Combine 1 c light brown sugar, 1 egg, 1/4 c dark molasses and 11/2 sticks (cooled) melted unsalted butter in a stand mixer fitted with the paddle attachment and mix until combined, about 20 seconds.
In a separate bowl add 2 c flour, 1 tsp baking soda, 1 tsp ground ginger, 1/2 tsp cinnamon, 1/2 tsp kosher salt,  and 1/4 tsp ground cloves.  Mix well. 

Add the dry ingredients to the butter-sugar mixture and combine only until fully incorporated.  It should be a wet, sticky dough.  Make sure you don't over mix! 

NOTE: It is best to let this dough refrigerate overnight, or at least 3-4 hours, in an airtight container before baking.  I only had a few hours so mine sat just over 2 and they still came out soft and chewy!

After your dough has set, take 1/4 c size balls and roll them in granulated sugar before placing them on an ungreased cookie sheet. This gives the cookies a wonderful sweet layer on top of all that that gingery goodness.
Bake the cookies for about 16-18 minutes at 350 degrees on the center rack of your oven.  They are done when they start to crackle on top and look as though they would be firm to the touch. Let them cool on the cookie sheet set on wire cooling racks for 15 minutes before transferring the cookies to the racks. The recipe yields 16 cookies so they will be good size.  If you'd like smaller ones just be sure you adjust the cooking time accordingly (aka watch them like a hawk in the oven and wait for the crackling!)


These were so simple yet so flavorful.  The granulated sugar made for a great presentation and added hint of sweetness to these moist, chewy cookies.  I'll definitely be making these again!


Wednesday, April 11, 2012

barley & me


My aunt made this great salad a few months ago for my birthday and it was absolutely delicious.  The simple, fresh ingredients paired with hearty barley keep you full if you're having it for lunch but can also be great as a side dish (hot or cold) with a nice lean protein for dinner.  If barley or arugula aren't your favorite ingredients feel free to use quinoa, wheat berries, or spinach to suit your tastes. 

Bring 1 1/4 cups of water seasoned with salt to a boil.  Add 1/2 cup uncooked pearled barley and turn heat down to low.  Let it cook for  20-30 minutes or until all the water has been absorbed.  The barley will be soft but still have a nice bite to it. Set aside. 
Heat 1 tsp of EVOO in a skillet and add 1 1/2 cups grape tomatoes with 1 1/2 tsp minced garlic.  As you can see I was a little too ambitious and decided to leave my tomatoes whole.  They didn't give out as much juice as I would have liked but squishing them with the back of my wooden spoon helped a bit.  (I recommend cutting them first so your garlic has some extra liquid to simmer in) 
After some juices are released (2-3 minutes) add in the cooked barley along with salt and pepper to taste.  If there's a decent amount of tomato juice make sure to simmer the mixture on low until all of the liquid is absorbed. 
Add 3 cups of baby arugula and combine.  I find using tongs makes incorporating leafy greens a little easier and moves the wilting process along.  
Remove from heat and drizzle with 1 tsp olive oil.  Add lemon zest to taste and give it all a good stir. 

There you have it! I decided to drizzle on some balsamic vinegar to finish it off which gave it an extra little zing.  I prefer this dish cold and am looking forward to taking some for lunch tomorrow after the flavors have had a chance to meld.  Enjoy the salad and don't forget to halve your tomatoes!


Monday, April 9, 2012

tuna, meet frank


After a non-stop day of eating yesterday (and thinking it was physically impossible to ever be hungry again) I awoke this morning still feeling full.  I knew a much needed trip to the gym was in my future so I forced a yogurt on myself and decided to get it out of the way.  I wasn't 5 steps out of the gym post workout when hunger consumed me.  I knew it was too good to last.  Wanting something healthy & light (and not covered in syrup or made with breakfast meats) I set my sights on a tuna sandwich.  Feeling like mayonnaise was on the heavy side of condiments to use after my aforementioned gorging I decided on one of my favorite ways to make a tuna sandwich: Frank's Red Hot!

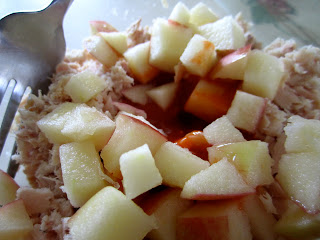
I love spicy foods and any chance I have to add a little Frank's to the equation is good for me. In this case I like to use Frank's Thick since it has a little more body then its counterpart (plus it's milder so it won't make the sandwich overpoweringly hot) and will hold the fish together, similarly to mayo.  Another favorite addition to tuna is apples.  Strange, I know, but the sweet balances out the sandwich (with or without mayonnaise) nicely and gives a good crisp.  In this case it's a great sidekick for Frank.


Chop up some sweet red apples (I used Jazz apples...if you haven't heard of/tried these beauties I highly recommend it) and add it to the tuna with about 1 T (or to taste) of Frank's Red Hot Thick


I lightly toasted some rosemary & olive oil Italian bread and added a slice of lettuce and american cheese for good measure

Accompanied by some fresh strawberries and leftover apples slices this sandwich was light, refreshing and had just the right amount of sweet heat. If you're skeptical about having hot sauce with tuna I urge you to give it a shot.  If this doesn't sound like something for you at least try throwing in apples when you make it traditionally. You won't be disappointed!


Saturday, April 7, 2012

gone bananas


Ever since I stumbled upon this amazing cupcake website I've been chipping away at the 33 crazy kinds featured.  And by chipping away I mean I've now made two.  You have to start somewhere, right? I've made the sour cream raspberry cupcakes with cream cheese frosting and just tackled the banana cupcakes with maple brown butter frosting today.  Both are even more delicious then they sound, if you can believe it.  These little cups of heaven will be accompanying me to Easter dinner tomorrow and I can't wait to show them off!

After combining the dry ingredients (with the exception of sugar which you'll be creaming with butter) you'll want to mash about a cup of bananas mixed with lemon juice.
The bananas will be added to the creamed butter and sugar along with buttermilk, the dry ingredients, an egg and vanilla extract.  Make sure it's mixed well!

The obvious step of filling the lined muffin pan comes after this.  It's a relatively thin batter so an ice cream scoop is recommended for easy and accurate bowl-to-pan transfer. They cook low and slow- 275 degrees for an hour or whenever a toothpick inserted comes out clean (mine took about 45 minutes).  They're then placed directly into the freezer for a half an hour. This gives you plenty of time to make the  icing.

Start by browning one stick of butter on medium heat.  If you think that you can leave this unattended and do 30 seconds worth of dishes without it burning, well, you'd be wrong and you'll have to throw out the blackened butter and start over.
Oops! 
After it's a beautiful golden brown you'll add it to the confectioners sugar followed by milk and delicious maple syrup.
Whisk the ingredients together until it's a nice smooth consistency like this. My cupcakes had a few more minutes to go in the freezer so I stuck the icing in the fridge to stay thick in the meantime.
Slice 1-2 bananas depending on how many you'd like for the tops. I gently mixed mine with about a tablespoon of fresh squeezed lemon juice to stop them from browning before Easter tomorrow. 
Finish them off with a light dusting of cinnamon.
This is such a fun alternative to a boring (but always tasty) banana bread.  The recipe is easy to follow and sure to be a crowd pleaser.  Mine are being stored in the refrigerator to make sure the icing sets.  The car ride tomorrow will give them just enough time to get down to room temp before they're devoured.  Feel free to jazz it up anyway you'd like- add some chocolate chips or walnuts for a little extra oomph!


little devil

Easter Sunday is tomorrow and for that reason I have spent the better part of the day whipping up some tasty treats for our family gathering.  One staple that never goes unappreciated is the classic deviled egg. A funny thing about this "classic", however, is that everyone seems to have their own version they claim to be the best.  I've dabbled in deviled egg making before but haven't found a recipe I've been pleased with until I found this one.  Everything a deviled egg should have is in here- nothing more, nothing less.

Now, before I start bringing you through a photo journey of the process I feel the need to share with you a life-altering (okay, maybe not life-altering, but awesome nonetheless) trick to cooking eggs.  Instead of stressing yourself out over attempting to boil them to perfection...bake them! That's right...I said bake them! Thanks to good ol' pinterest I came across this gem of a blog which walked me through the extremely simple process.  Whether it's one egg or two dozen it's the same cooking time- 30 minutes.  Use her idea of using a mini muffin pan to stop them from rolling around in the oven and you'll have perfectly "hard boiled" eggs in no time!

After cooking make sure to submerge them in an icy bath for about 10 minutes before trying to peel them.
This will also stop the eggs from cooking so your yolks don't turn green!
Perfectly cooked and zero effort.
Remove the yolks from the whites and mash with a fork.
Add in your mayonnaise and spices.  Mix.

Note: Make sure to refrigerate the yolk mixture at least two hours before filling the whites.  This will give the flavors time to intensify and allow the mix to stiffen up.
I like to use a decorative pastry tip to pipe mine.  A little flare never hurt anyone, right?
Sprinkle with paprika.
Eggcellent!

And there you have it!  Perfect deviled eggs!


roll, baby roll


Everybody who's anybody knows that on the rare occasion you have lobster and there are actually leftovers (yes, that can happen) there's only one thing to do: make lobster salad! I was lucky enough to have just about a whole lobster left- chilled, de-shelled, and ready to be made into a scrumptious Saturday sandwich.  Having made this a few (dozen) times before I have definitely learned that the less-is-more principle applies here.

Things you will need:

Chilled, chopped meat from 1 lobster

2 T mayonnaise
1tsp dried dill weed (or to taste)
1 T fresh lemon juice
salt & pepper (to taste)

Ahh, the taste of summer!

That's it! Simple, fresh, and delicious.  I let mine sit in the fridge for about an hour and a half to let the flavors meld before I dove in.  Portuguese rolls from my local deli I had lying around sufficed (I cut a deep V in the top of the roll to ensure it would all pack on top nicely) and after it was lightly toasted I lined it with a crisp piece of iceberg lettuce and stuffed every sweet piece of meat on top.

Next time you find yourself with some leftover lobster meat make sure to try this easy, impressive salad!


Blog Template by Delicious Design Studio